
Here at Oderland, all our servers run on LiteSpeed. It’s a server software that is customized for extra performance. In other words, when you install WordPress with us, it will be fast.
There are a variety of techniques to make the site load even faster. You’ve probably heard of some of them. Cache, CDN, optimization and more. In our great guide to performance optimizing your website, you’ll learn more about what the different techniques are and what they’re good for.
To get the maximum performance out of your site, we recommend the LiteSpeed Cache add-on for WordPress. In this guide, we’ll show you how to set it up for maximum performance, and tell you why.
Just want all the settings? Then you can download our settings file and import directly into the extension. You’ll find it at the end of this guide.
This guide is tailored for a single-site WordPress. If you are using multisite, some of the settings will be in the network admin instead of on each site.
Throughout the guide, we mainly comment on changes that differ from the defaults.
At the end of June, version 4.1 of LiteSpeed Cache for WordPress will be released. We have adapted this guide for the new features there. Therefore, some features may not be available in earlier versions. You can try 4.0 now by manually upgrading to 4.0.
- Why LiteSpeed Cache for WordPress?
- Generate a domain key
- Cache
- Optimize images
- Optimize the page
- Optimize the database
- Crawler
- Import settings file
Why LiteSpeed Cache for WordPress?
There are lots of cache extensions for WordPress on the market. So why LiteSpeed Cache for WordPress?
Well, it’s because LiteSpeed Cache for WordPress is specifically built to interact with the LiteSpeed server. When WordPress and the server can work extra close, you can also get extra good performance.
Generate a domain key
Some of the extension’s features, such as automatic image optimization, require an active domain key. The key is completely free.
To generate a key, go to LiteSpeed Cache > General and click on Request Domain Key.

Once you have done this, it will take a few minutes before you receive an approved key back from LiteSpeed. Normally, this takes no more than 10-15 minutes. Often shorter than that.
Cache
You can find the cache settings under LiteSpeed Cache > Cache. They are divided into several groups.
Read more about what cache is and what it’s good for in our great guide to optimizing your website’s performance.
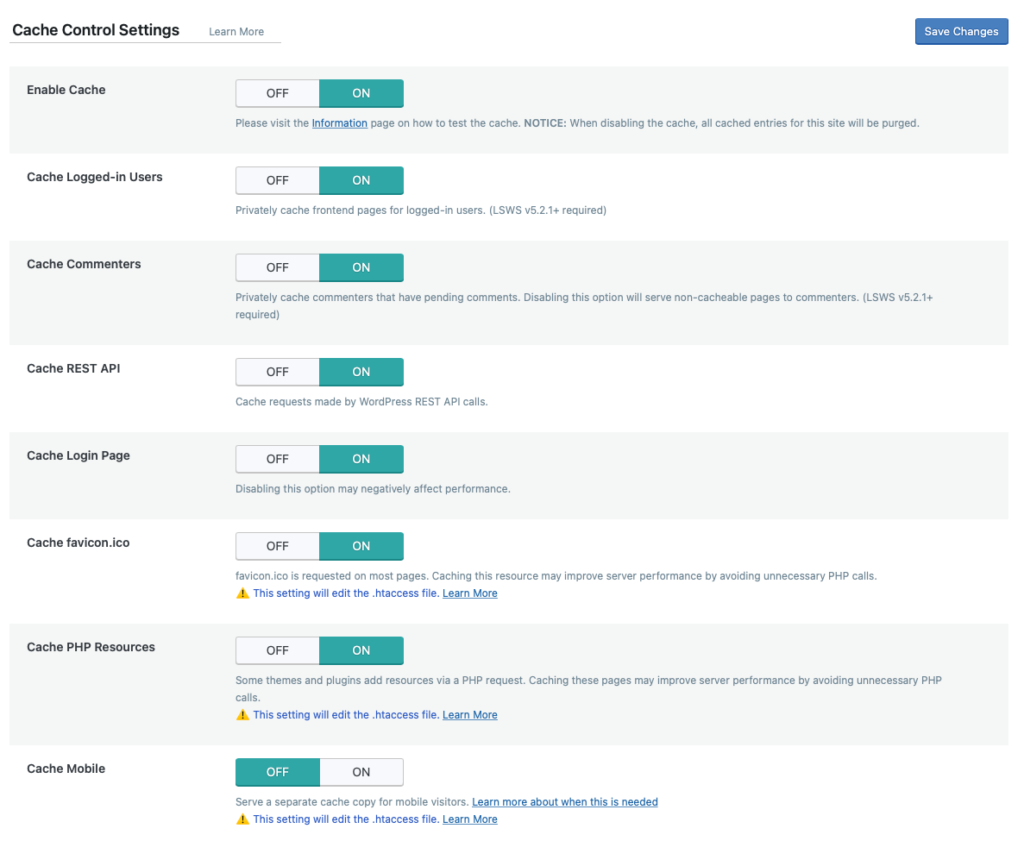
1. Cache Control Settings
The global cache settings control whether the cache is enabled and what should be cached. The default settings are fine and enable all the cache components that you typically want.
That is:
- Enable Cache.
- Do you have users who can log in outside the admin panel? If so, you’ll want to enable “Cache Logged-in Users”.
- Enable cache for REST API
- Enable cache for Login Page
- Enable cache for favicon.ico
- Enable cache for PHP resources
- Disable cache for mobile as long as you have a regular responsive site. If you have a completely separate mobile site, you may need to turn on mobile caching. How do you know? If you need to ask, you can leave this off.
2. TTL
The settings in the TTL (Time To Live) section determine how long it should take before the cache is cleared and a new current version is saved.
We recommend that you use the recommended values shown below each field unless you have specific needs of your own.

3. Purge
When you update content on your website, you obviously want the cache to be purged. Otherwise, the old content will continue to be visible to your visitors. This is a common cache problem.
To make it easier, you can let your site do this automatically.
Make sure that cleanup on upgrades is enabled.
For the vast majority of websites, the default settings about what to clear when publishing/updating content will work. For example, if you have a widget with recent posts that appears on all pages, you may want to clear all pages when posts are updated.
4. Excludes
The excludes settings allow you to specify specific pages on your site that should not be cached for various reasons. This can be useful if you have single pages with content that varies specifically for the user.
Are you running WooCommerce? Then you don’t need to think about exclusions for your store here. LiteSpeed Cache for WordPress will in fact automatically take into account the pages in WooCommerce and make sure that the cache works fine and is excluded in the shopping cart, among other things.
5. ESI – Edge Page Includes
Since caching is all about delivering the same preloaded page to many users, content that is unique to one user is a problem. One solution to this is Edge Side Includes.
ESI allows you to set individual parts of the page as dynamic, such as a mini-cart that displays the total in the shopping cart and, among other things, excludes that particular cart from caching.
Using ESI is a more advanced feature. You should test in advance how this affects your particular site, and have some knowledge of development to do it well.
6. Object Cache
Every time you load a page from your WordPress site, data is retrieved from the database. All your content and settings are stored in the database. Using the object cache, the requests made to the database are cached so that the answers to the requests can come faster.
Our servers support both Memcached and Redis. We recommend using Object Cache with Memcached; in our tests it is slightly faster.
First you need to activate Memcached via cPanel. This does not cost anything extra. Read more about how to do this here ›
Does it say disabled? If it says memcached and redis is disabled, you need to enable it here. Follow this guide ›
You need to set the following settings for our servers:
Host: /tmp/memcached
Port: 0

When you save changes, you will see that “Connection Test” in the status box has the value Successful. Now you can set Object Cache to On.
7. Browser
To take advantage of the browser’s built-in cache functionality, you need to signal to it how long different types of content should be stored before being retrieved again.
Enable the browser cache by setting it to On. The default setting of storing content for 31557600 seconds (1 year) is adequate.
Optimize images
Never having to think about optimising the images you upload is convenient and a great job for technology to “just fix” for you. Enabling image optimisation keeps images as small as possible (in file size) while not losing unnecessary image quality.
Read more about image optimisation in our big guide to performance optimisation.
Image optimization in LiteSpeed Cache for WordPress works on in the background. When you upload an image, the site sends the image away to be optimized. Once it’s done, the unoptimized one is replaced with the optimized one. Completely in the background.
When you enable image optimization for the first time on an existing site with many images, it will take a while to work through them all. The system will automatically upload small groups of images. So depending on how many images you have, it will take a while before you notice image optimisation on your site. The original images are saved as a backup.
The LiteSpeed Cache > Image Optimization page gives you an overview of the status of the optimization. Here you can see, among other things, how much space you have saved on optimization.
For image optimization to work best, we recommend that you replace WordPress’ built-in scheduled events (cron) with your own in cPanel. Read more about how to do this in our guide.
To get started with optimization, go to the 2. Image Optimization Settings tab. We recommend adding the following to the default settings:
- Auto Request Cron ensures that images are sent off for optimization automatically. Therefore set this to On.
- Create WebP Versions automatically creates webp versions of images. They are supported in some websites and usually smaller and therefore load faster. Set this to On.
- Image WebP Replacement automatically replaces images with the webp versions where possible. Since you have chosen to create WebP versions, you will also want to set this to On.
Optimize the page
You’ll gain a lot by optimizing the page itself and the code to be as small and smooth as possible. The more unnecessary code you load that isn’t used, the slower it will run.
Want to know more about why optimizing the page is good and what it is? Then read more in our great guide to performance optimisation.
As you go through this section, remember to constantly test your site thoroughly. How well it will do to optimize CSS, JavaScript and HTML depends on how well coded the theme and extensions you use are. If the page “breaks” visually when you activate any of the options, you need to back off and turn it off.
Optimize CSS
We can divide the optimization of CSS into three main parts:
- Minify the code by removing unnecessary characters, comments and spaces.
- Merge the files and remove unused code.
- Load CSS asynchronously, i.e. only when it is needed.
You almost always want to turn on CSS minification (“CSS Minify”), and this usually doesn’t cause any problems either. Also enable CSS HTTP/2 push and set Font Display Optimization to Swap.
Today, having a small number of files is not as important as it used to be. Browsers load them in parallel, so it can even be faster with several smaller files than one large one. By merging the CSS files in LS Cache for WordPress, however, you get the opportunity to remove unnecessary code.
The extension scans through each page of your site and compares the HTML code with the CSS code. Then, by looking for the CSS classes in use, it removes what’s not being used. This results in a greatly reduced amount of CSS being loaded. This helps load time.
A warning here is in order though. This requires testing. If you have a very dynamic page, with modal windows, popups or other features that dynamically change CSS rules, LS Cache may miss this code. To resolve this, you can add these CSS rules to the “UCSS Whitelist” under the “7. Tuning” tab yourself.
When pages get long, there is a lot of content that may not need to be loaded directly. So do style sheets. By loading CSS asynchronously, LS Cache first tries to assess what CSS is needed to display the first screen nicely, and then loads the rest in the background. This results in faster load times.
As with unique CSS, asynchronous CSS requires you to test the loading carefully. Again, you can manually specify CSS rules under the “Tuning” tab that you always want to be loaded.
Optimize JavaScript (JS)
We can also divide the optimization of JavaScript into three main parts:
- Minify the code by removing unnecessary characters, comments and spaces.
- Merge the files as well as possibly inline code.
- Load the JavaScript code delayed.
You almost always want to turn on the option to minify the JavaScript code (“JS Minify”). This rarely causes major problems. Also enable JS HTTP/2 Push.
When it comes to combining files, it’s not as obvious. If you use many different extensions, the risk of problems is high. At the same time, reducing the number of resources is not as important today as it was in the past. Therefore, we recommend that you skip combining JavaScript files.
However, delaying the loading of JavaScript has a greater performance impact. Delayed loading loads the site fully first. Then the scripts are loaded. This results in better load times and a faster user experience.
This can also cause compatibility problems with different extensions and themes. We recommend that you try “Delayed” first, and “Deferred” second.
Optimizing HTML
Unlike both JavaScript and CSS optimization, HTML code optimization is much less problematic. However, as before, you want to test the site after you have enabled the HTML settings.
- Choose to minify the HTML code (“HTML Minify”).
- Enable DNS Prefetch Control. This will make connections to other domains with other resources on (such as tracking pixels) faster.
- If you use google fonts, enable to load Google Fonts asynchronously.
- Enable to remove WordPress Emoji. Today, browsers and all major operating systems have good support for emojis built-in.
Optimize media
Images and video are usually the things that take the longest to load on a website. Even though we have optimized the image files so they are small in file size. By delaying the loading of images and videos on the website, we can get a faster loading time. Only when the whole page has loaded will the images load.
Please enable lazy loading of images. We also recommend combining it with enabling Responsive Placeholder. Without it, the delayed loading will cause the page to jump in loading, which negatively affects both ranking and user experience.
Also enable “Add Missing Sizes” to further reduce the bouncing effect.
A monochrome placeholder image, on the other hand, is quite boring. After all, you have images on the site to liven things up. Not to start by displaying a boring box.
That’s where LQIP placeholders come in. LQIP stands for “Low Quality Image Placeholder” and is a low-resolution version of the original image. Loading it is quick. The visitor sees a very blurry version while the full-resolution one is being loaded. It’s a nice way to get both delayed loading, but without the tedious experience of placeholder images. Enable it by turning on the LQIP Cloud Generator.
Finally, we also recommend optimizing iframes in the same way. Most likely, you mainly use iframes behind the scenes to embed videos from YouTube, for example. Their content doesn’t need to be loaded until they appear on the page.
Local copies of external resources
It will always be faster to load a resource from your web server rather than from an external source. Resources such as fonts, tracking pixels and the like are a bit faster when they are local. It’s not a huge effect in itself, but many small streams make big results.
However, you can’t just save the file and load it yourself. You need to continually check for updates and changes. LS Cache for WordPress can handle this automatically.
We therefore recommend that you enable “Localize Resources”.

Exclude resources and pages to solve problems
When you enable the various optimization parts for the page, you may run into problems with a file not quite being able to be optimized. Instead of skipping optimizing everything else, you can instead choose to exclude that specific file.
Under the “Tuning” tab, you will find a number of special settings for excluding specific files or pages from being optimized. This is a good way to solve minor compatibility problems that arise during optimization.

Optimize the database
Maintaining the database on an ongoing basis makes it both smaller in size and more efficient. This can be things like emptying the trash, removing expired temporary storage, or optimizing the database tables. After a while, you can also build up a large version history with revisions to posts and pages that might be purged.
Under LiteSpeed Cache > Database you will find various optimizations to do around the database.

We recommend that you optimize the tables (“Optimize Tables”) on an ongoing basis, and remove spam comments (if you have comments enabled).
You can also see if any of your database tables are on MyISAM and if they are, convert to InnoDB. These are two formats of database tables in MySQL. We recommend InnoDB as a bit faster and better in most cases.
If the “Database Table Engine Converter” table contains rows, you can convert them to InnoDB with the click of a button. Remember to take a backup before converting the table.

Crawler
The big win with optimization and caching is that we can provide the same static files to many visitors instead of loading the entire site from scratch on each visit.
At some point, the temporary file must be created. This happens when a visitor reaches a page where no temporary file exists, or when the file has expired. For that visitor, the loading time will not be faster, but slower.
A good way to avoid this is to preload the cache. By automatically crawling the site and creating the temporary cache files regularly, all visitors will get a cached version. We do this by turning on the spider (crawler).
Before enabling the crawler, we recommend setting up a real cron job instead of the WordPress built-in one.
You can find it under LiteSpeed Cache > Crawler and it requires a few simple settings to get started.
- Under the
Sitemap Settingstab, enter the URL of your site’s XML sitemap. Since WordPress 5.5 it is built into WordPress. Then you can enter the link:https://mydomain.com/wp-sitemap.xml.You replacemydomain.comwith your own domain name. Then press save. - Under the
Maptab, click theRefresh Crawler Mapbutton. Depending on the amount of content, this may take a little while. When the page finishes loading, you will see a list of all the content on your site. - Now you can go to the
General Settingstab and choose to activate the crawler. Once you save the settings it will start doing.
Keep in mind that it will now take a while for the crawler to make its way through all your content. The first time, the summary page will show a big number under the blue “Miss” boxes. From the second time on, the amount of hits will increase.
Resetting the settings
The cache settings are very dependent on your particular site, your theme and your set of extensions. Some interact better than others, and sometimes combinations can create problems.
If you’ve gone through the guide step by step, you’ll have continuously tested what works and what doesn’t. Then you can smoothly roll back the latest setting when it doesn’t work.
If you need to reset the settings, you can do so under LiteSpeed Cache > Toolbox and the Import/Export tab.
Import settings file
If you don’t have the time to go through the whole guide, we have created a settings file with our recommended settings that you can import.
To import it, go to LiteSpeed Cache > Toolbox and the Import/Export tab. Select the file from your computer and click import.
Remember to test your site very carefully after importing the settings. Please read especially the sections on JavaScript and CSS minification in this guide. The settings there may need to be adjusted depending on your particular site. You should be alert to common errors that may occur.